 Zoetrope
Getting started
Zoetrope runs as a desktop app on macOS, Windows and Linux, and as a web app in any modern browser. Both are the same editor.
Install
Download the file for your system from the download section (or the latest release).
macOS
- Open the
.dmgand drag Zoetrope into Applications. It is one universal app for Apple Silicon and Intel Macs. - The first time, right-click (or Control-click) Zoetrope in Applications and choose Open, then Open again. The app isn't notarized by Apple yet, so a plain double-click is refused once.
If macOS says the app "is damaged", it was quarantined by the download. Run
xattr -dr com.apple.quarantine /Applications/Zoetrope.app in Terminal, then open it normally.Windows
- Run
Zoetrope_…_x64-setup.exe(or the.msiif you deploy with Group Policy). - If SmartScreen shows "Windows protected your PC", click More info → Run anyway. The installer isn't code-signed yet.
- The installer adds Microsoft Edge WebView2 if your system doesn't have it (Windows 11 always does).
Linux
Zoetrope needs WebKitGTK 4.1, which ships with Ubuntu 22.04+, Debian 12+, Fedora 37+ and similar.
- AppImage (any distribution):
chmod +x Zoetrope_*.AppImagethen run it. Some systems needlibfuse2first (sudo apt install libfuse2). - Debian/Ubuntu:
sudo apt install ./Zoetrope_*_amd64.deb - Fedora/openSUSE:
sudo dnf install ./Zoetrope-*.x86_64.rpm
The web editor
Open the web editor in Chrome, Edge, Firefox or Safari 16.4+. Nothing is installed, and nothing is uploaded anywhere: your project stays in the browser. The differences from the desktop app:
- Save downloads a
.zoefile and Open asks you to pick one. There's no recent-files list. - Autosave and preferences are kept in the browser's storage for this site.
- Exports download to your Downloads folder (a folder export downloads three files).
A tour of the editor
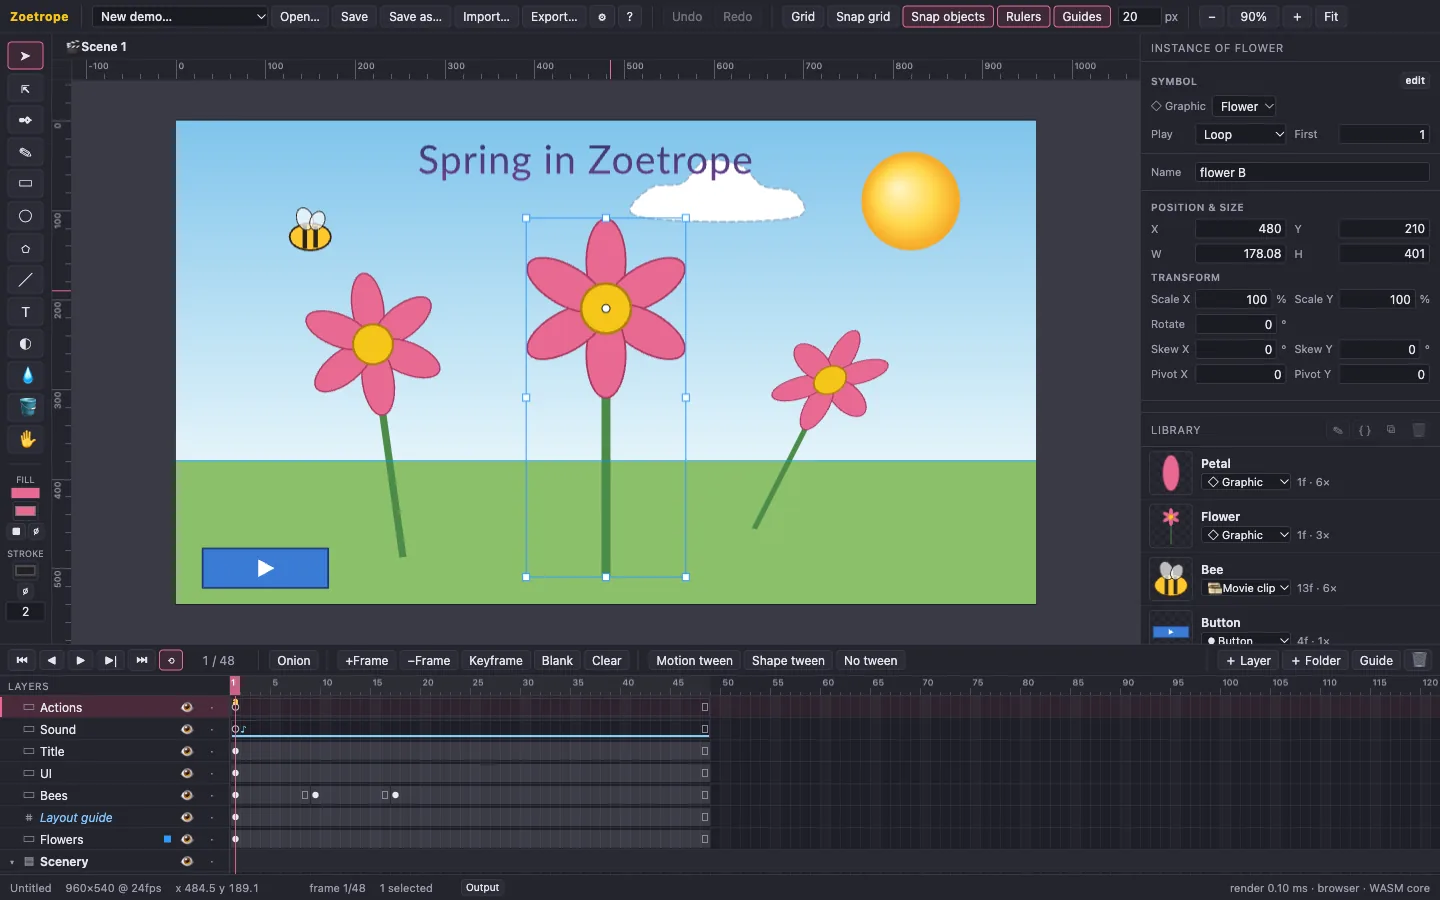
| Area | What it's for |
|---|---|
| Toolbar (top) | New… (blank project or a demo), Open…, Save, Import… (images), Export…, Recent… (desktop), ⚙ preferences, ? shortcuts, then undo/redo, grid and snapping, rulers, guides and zoom. When a tool has options (polygon sides, pencil mode, text style), they appear here too. |
| Tools (left) | Selection, subselection, pen, pencil, rectangle, ellipse, polygon/star, line, text, gradient transform, eyedropper, paint bucket and hand. Below them, the fill and stroke used for new shapes. |
| Stage (center) | What you're making. The white rectangle is the visible area; the darker pasteboard around it holds off-stage content. Rulers show stage coordinates; the status bar shows the cursor position. |
| Properties (right, top) | Changes with what you select: the stage, an object (position, size, transform, opacity, blend, tint, fill and stroke, align), a text, a symbol instance, or a frame (tween, easing, label, script, sound). |
| Library (right, bottom) | Your symbols. Drag one onto the stage to place an instance; double-click to edit it. |
| Timeline (bottom) | Layers on the left, frames on the right. Play, step, onion skin, insert frames and keyframes, add tweens, add layers and folders. |
| Status bar | File name (• means unsaved changes), stage size, cursor position, current frame, messages and errors, the Output panel for scripts, and how long the last frame took to draw. |
Projects and files
- In the desktop app, double-click a
.zoefile to open it in Zoetrope. Every command is also in the menu bar (File, Edit, View, Modify, Control, Help), with its shortcut. - Closing the window or quitting with unsaved changes asks whether to save first.
- A project is one
.zoefile. Images, fonts and sounds you import are embedded in it, so you can move or share the file on its own. - Zoetrope autosaves unsaved work every 30 seconds (change it in ⚙ Preferences). If the app quits or crashes before you save, it offers the work back the next time it starts.
- Every change can be undone (⌘Z / Ctrl+Z), including timeline, symbol and script changes.
Next: make your first animation.